 Pin it
 My sister called me three weeks before graduation with panic in her voice—she'd volunteered to bring treats for the celebration but had zero ideas. I was elbow-deep in laundry when she asked if I could help her make something that screamed school spirit. That's when cake pops hit me like a lightbulb moment: tiny, elegant, totally customizable, and honestly, kind of fun to make together. We spent an afternoon in her kitchen rolling cake balls and dipping them in her school's purple and gold, and watching her face light up when they turned out perfect made the whole messy process worthwhile.
I'll never forget handing my sister that first box of finished pops. She opened it carefully like they were made of glass, and then just started laughing—not because they were perfect, but because we'd actually pulled it off together, despite her initial stress and my skepticism about whether homemade cake pops were worth the effort. Turns out, watching someone feel proud of something you helped create hits different than eating the best dessert ever could.
Ingredients
- Vanilla or chocolate cake mix (1 box, about 400 g plus package-listed ingredients): The base matters more than you'd think—I've used both, and vanilla lets the frosting shine while chocolate gives you that rich backdrop for bold coating colors.
- Unsalted butter, softened (1/2 cup or 115 g): Softened is key here; if it's still cold, your frosting turns grainy and tough to work with, which I learned the hard way.
- Powdered sugar (1 1/2 cups or 190 g): Sifted powdered sugar mixes smoother into butter, though if you're in a hurry, a few extra seconds of beating handles lumps just fine.
- Milk (1 tablespoon): This adjusts the frosting texture; add it gradually because too much turns your mixture into soup faster than you'd think.
- Vanilla extract (1 teaspoon): Real vanilla makes a noticeable difference in the frosting flavor—the good stuff is worth it.
- Salt (pinch): Tiny but mighty; it balances the sweetness and makes the frosting taste more refined.
- Candy melts in two school colors (450 g or 16 oz total): These are forgiving because they melt smoothly and set quickly, unlike chocolate which can be temperamental.
- Vegetable shortening or coconut oil (2 tablespoons, optional): Adding this makes your dipping chocolate flow like silk, preventing thick clumpy coatings.
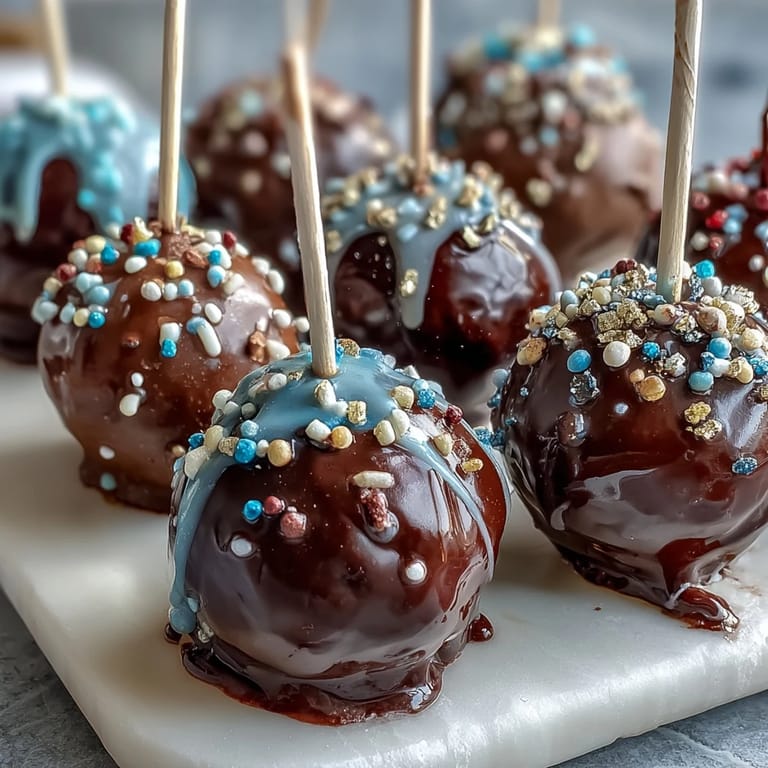
- Gold sprinkles or edible gold glitter: This is where the graduation vibe comes in; don't skip it or use regular sprinkles because the effect just isn't the same.
- Lollipop sticks (24): These become the handle and structure, so get the sturdy ones, not the flimsy cocktail picks.
- Styrofoam block (for drying): Any craft store has these; they're essential for letting your pops set upright without toppling over.
Tired of Takeout? 🥡
Get 10 meals you can make faster than delivery arrives. Seriously.
One email. No spam. Unsubscribe anytime.
Instructions
- Bake the cake and let it cool:
- Follow the box instructions exactly, then give it real time to cool completely—warm cake makes mushy balls that won't hold their shape. I usually bake mine in the morning and start working with it after lunch when I'm certain it's cold.
- Whip up the frosting:
- Start beating that softened butter until it looks pale and creamy, then gradually add the powdered sugar so you don't create a cloud of it everywhere. Once it's smooth, add milk, vanilla, and salt, and keep beating until it tastes like the frosting you actually want to eat.
- Mix cake with frosting into cohesive balls:
- Crumble the cooled cake into a big bowl and start folding in frosting a little at a time—you want a texture that holds together when you roll it but isn't dense or wet. Too much frosting and your balls turn into frosting bombs; too little and they'll crack apart.
- Roll and chill the cake mixture:
- Use a tablespoon or cookie scoop to make uniformly sized balls, then place them on a parchment-lined baking sheet. Stick them in the fridge for an hour (or freezer for 30 minutes) because cold cake balls are the difference between smooth dipping and messy disaster.
- Secure the sticks with melted candy:
- Melt just a small amount of candy melts, dip each stick's end in it, then push it halfway into a chilled cake ball—this glue holds everything together once you start dipping. If a stick slides around, your pop will spin off when you dunk it.
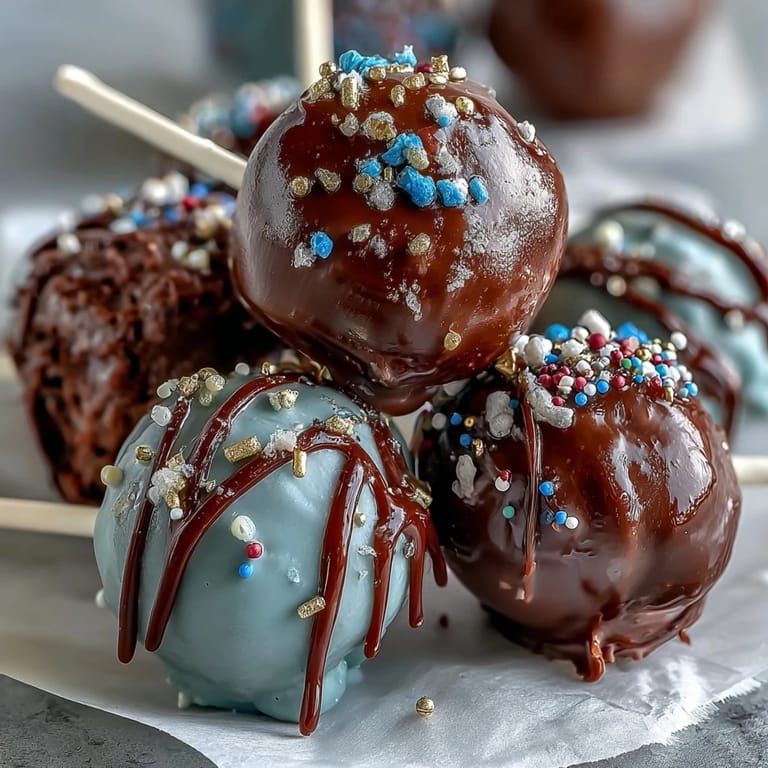
- Dip into school colors:
- Melt your candy melts according to package instructions and add a tablespoon of shortening if you want them silkier. Hold each cake pop by the stick and dip it slowly into one color, then twist gently and lift it out, letting excess drip back into the bowl for a few seconds.
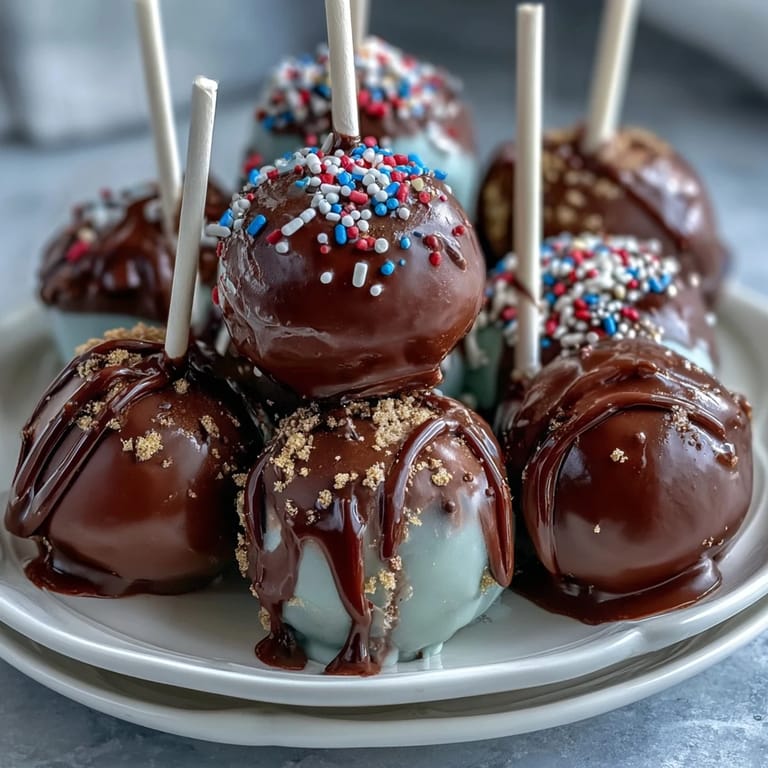
- Add the gold flourish:
- While the candy coating is still sticky and wet, sprinkle or dust with gold sprinkles before it sets—once it hardens, the sprinkles won't stick. This is the moment that transforms them from nice to genuinely celebratory-looking.
- Set and harden in Styrofoam:
- Push each stick into the Styrofoam block upright so the coating can set without dripping or leaning against anything. Leave them sitting undisturbed for at least 30 minutes, though longer is fine.
 Pin it
 My favorite moment happened when a kid at the graduation party bit into one and got that perfect snap of hardened candy coating followed by soft cake. Their surprise at how well-balanced the sweetness was reminded me that these aren't just decoration—they're actually delicious. Sometimes the most meaningful celebrations are built on tiny, thoughtful details like gold sprinkles and school colors.
Why These Work for Graduations
Cake pops sit in this perfect space between homemade and polished—they signal effort without screaming that you spent all day in the kitchen. They're portable so people can grab them while mingling, they photograph beautifully for the inevitable social media moments, and school colors make them instantly personal and relevant. Plus, 24 pops is the exact amount that feels generous without being overwhelming to make.
Troubleshooting Common Mishaps
I've learned a few lessons making these repeatedly, and the biggest surprise is how forgiving the process actually becomes once you understand what goes wrong. The most common issues stem from either temperature (too-warm cake or too-thin candy coating) or proportions (frosting-to-cake balance), and both are fixable if you know what to look for. Most of my early failures taught me more than my successes did.
- If pops are falling off sticks during dipping, your frosting wasn't firm enough or your stick wasn't secured deeply enough—either chill longer or insert sticks deeper next time.
- If your candy coating is too thick and gluey, thin it with a bit more shortening rather than trying to microwave it hotter.
- If gold sprinkles aren't sticking, you waited too long after dipping to apply them—speed matters here.
Storage and Gifting Ideas
Once they've fully set, store cake pops in an airtight container at room temperature for up to three days or in the fridge for a week if you made them ahead. If you're gifting them (which feels natural because they're so gift-worthy), nesling them in a decorated box with tissue paper makes it feel extra thoughtful. I've also seen people tie tiny ribbons around the sticks in coordinating colors, which takes them from nice to genuinely special-occasion-quality.
 Pin it
 These cake pops turned my sister's graduation party into something she still talks about, and now whenever someone asks about celebratory desserts, she recommends them. Making them together became as memorable as eating them, which feels like the whole point of cooking for people you care about.
Recipe Questions & Answers
- → How do I ensure the coating sticks well?
Dip the stick end into melted candy before inserting it into the cake ball. This helps anchor the coating securely.
- → Can I use different cake flavors?
Yes, vanilla or chocolate cake mixes work well. Adjust the coating color to contrast or complement the cake.
- → What’s the best way to get a smooth coating?
Adding a bit of vegetable shortening to melted candy melts creates a smoother, shinier finish.
- → How long should the cake balls chill before dipping?
Chill the shaped balls for at least an hour or freeze for 30 minutes to firm up before coating.
- → How should I store these pops after making them?
Keep them in an airtight container at room temperature up to 3 days or refrigerate for up to a week.